Auxiliary Equipment
RS-485 and RS-232 Interfaces
Connection of auxiliary equipment (CAN-Log, PP-01 passenger throughput sensors, DV-1 driver display, JPEG camera, data reception from vehicle J1708 data bus, reception and transmission of navigation data as per NMEA standard) is carried out through RS-485 and RS-232 interfaces. When needed, it is recommended to use the RS-232 to RS-485 converter.
In the “Settings” window open the “Inputs” tab:
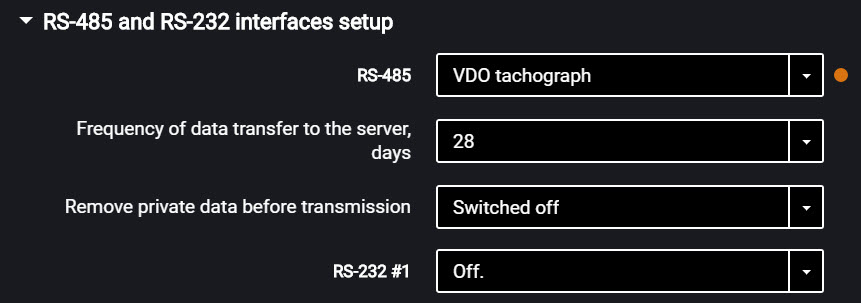

For RS-485 and RS-232 interfaces choose the setting:
- “Disabled” – interface is not used
- “Omnicomm LLS” – use for connecting fuel level sensors Omnicomm LLS
- “Omnicomm LLS / LLD” – use for connecting fuel level sensors Omnicomm LLS, Omnicomm LLD indicator
- “ALM Weight Indicator” – use for connection to the axle load monitoring device
- “CAN-log” – connection to a CAN-log device
* “J1708” – connection to the vehicle J1708 data bus
- “NMEA reception” – use of navigation data from an external device. If you select this option, you must specify the data port bit rate. “RS port bit rate for NMEA data” – select the data port bit rate for reception of navigation data from an external device
- “NMEA transmission” – use of the terminal navigation data in an external device
- “PP-01” – use for connection of the passenger throughput sensor
- “Camera” – use for the digital camera connection
- “DV-01” – use for the driver display connection
- “Tachograph VDO” (only in Omnicomm Configurator) – use for Continental tachograph connection
- “Frequency of data transfer to the server” – select the number of days for the DDD files transmission to the communication server. Possible options: from 1 to 28 days.
- “Remove private data before transmission” - if necessary, enable deleting the driver's personal data prior to data submission to the server.
- “iQFreeze” – use for connection of the refrigerator control device
- “Modbus (Struna +, PMP-201)” – use for connection to the level gauge PMP-201 or the Struna + system
- “Custom Modbus” – is used to connect equipment which operates with Modbus protocol standard (except for Smart)
- “Port baud rate” – specify the Modbus port baud rate operation Possible options: 9600, 19200, 38400, 57600, 115200.
- “Port settings” – select the port settings Possible options: 8-N-1, 8-N-2, 8-Е-1, 8-Е-2, 8-О-1, 8-О-2.
- “TPMS Pressure Pro” (only for RS-232 interface) – use for connection of the tire pressure sensors though TPMS Pressure Pro protocol
- “Truck-TPMS” (only for RS-232 interface) – use for connection of the tire pressure sensors though Truck-TPMS protocol
- “TPMS 6-13” (only for RS-232 interface) – use for connection of the tire pressure sensors though TPMS 6-13 protocol.
Fuel Level Sensors
In the “Settings” tab select the “Inputs” section from the list.
In the “Fuel Level Sensors” section:
“Data source” – select the type of fuel level sensors. Possible options:
- “Digital LLS” – when connecting fuel level sensors Omnicomm LLS
- “Frequency
LLS-AF ” – when connecting fuel level sensor OmnicommLLS-AF - “Vehicle sensor” – when connecting the vehicle standard fuel sensor
- “CAN Bus” – when connecting to the CAN bus
- “Struna +” – when connecting to the “Struna +” system
- “PMP-201” – when connecting the level gauge PMP-201
- “Disabled” – in case fuel level control is not required.
When Omnicomm LLS and Omnicomm
“Number of connected sensors” – specify the number of sensors connected to the terminal.
When choosing LLS fuel level sensors connected to a universal input, you need to configure the universal input. For automatic configuration of the universal input in Omnicomm Configurator press the “Configure UI” button.
“Filtration” – enter the size of inner filter. Possible options of filtration:
- “None” – filtration is performed only according to the settings in the Omnicomm LLS sensor
- “Low” – used in case of product installation in stationary fuel storages and non-mobile machinery
- “Medium” – used in case of vehicle's operation in normal road conditions
- “Strong” – used in case of vehicle's operation in normal and severe road conditions
- “Maximum” – used in case of vehicle's operation in severe road conditions and when connecting a standard fuel sensor with analog output
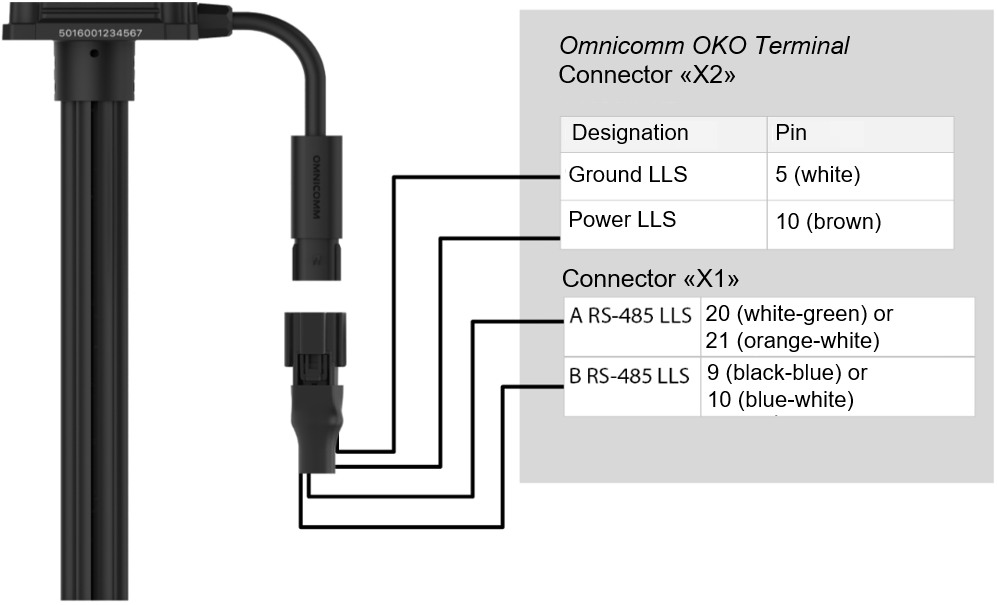
Connection of Omnicomm LLS fuel level sensor should be performed according to the diagram:
Connect Omnicomm
Connect several Omnicomm
Omnicomm
When connecting the video terminals to the “Struna +” system or the “PMP-201” sensor:
- “Fuel tank volume, L” – enter the fuel tank volume. Possible values: from 0 to 65,000
- “Current fuel volume, L” – displays the current volume according to
the “Struna +” system or the “PMP-201” sensor
Connect the “PMP-201” sensor and the “Struna +” system according to the documentation on these devices. You may connect only one “Struna +” system. The network address, by default, is 80.
Omnicomm ICON Display
In the “Settings” tab select the “ICON” section from the list.
“ICON” – check the box to display data from the terminal on the Omnicomm ICON Display
- “Network address” – select the display network address. Possible values: from 7 to 254
- “Select a time zone” – check the box to select the time zone with reference to UTC. The value of the time zone is used in case where automatic accounting of time zones is not required
“Time zone” – select the time zone
- “Notify on status change via SMS” – check the box to send SMS to the dispatcher’s number about changing the driver's status. Notification contains the new status of the driver.
- “Sound notification” – check the box to enable sound notification when registering the event specified when configuring the terminal and the display
In the “Settings” tab select the “Additional equipment” section from the list.
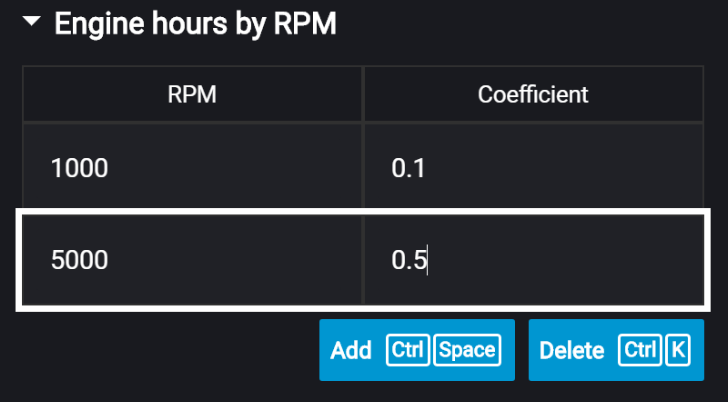
“Engine hours by RPM”, fill in the RPM to engine hours conversion table:
Enter the RPM value in the “RPM” field, in “Coefficient” field enter the value of conversion factor to calculate engine hours.
The conversion factors are determined based on the vehicle operating conditions. Maximum number of rows – 5.
The engine hours are displayed in hours with a decimal part (1.50 equals to 1 hour and 30 minutes) in the format HH.XX within the range of up to 100 engine hours and HHH.X for 100.0 - 999.9 engine hours. If the number of engine hours is higher than 1000, the last three significant digits and one symbol after the decimal point are displayed.
All engine hours are recorded in the terminal and sent to the CS as accrued total.
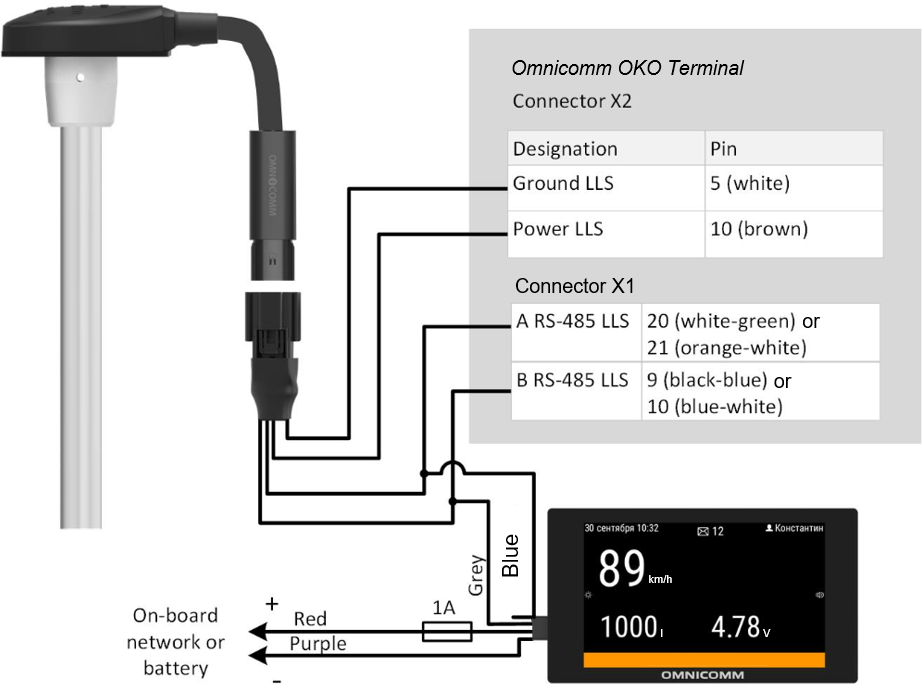
Connect Omnicomm OKO 3.0 terminal to Omnicomm ICON display according to the diagram:
Omnicomm LLD Indicator
In the “Settings” tab select the “Auxiliary equipment” section from the list.
In the “Data transmission to Omnicomm LLD indicator” section:
“Data source” – select the data source to display the value on the Omnicomm LLD indicator. Possible options:
- “GPS speed” – displays the vehicle speed
- “Universal input“ – displays the status or values on the terminal universal input depending on the connected auxiliary equipment
- “Engine hours by RPM” – displays vehicle engine hours
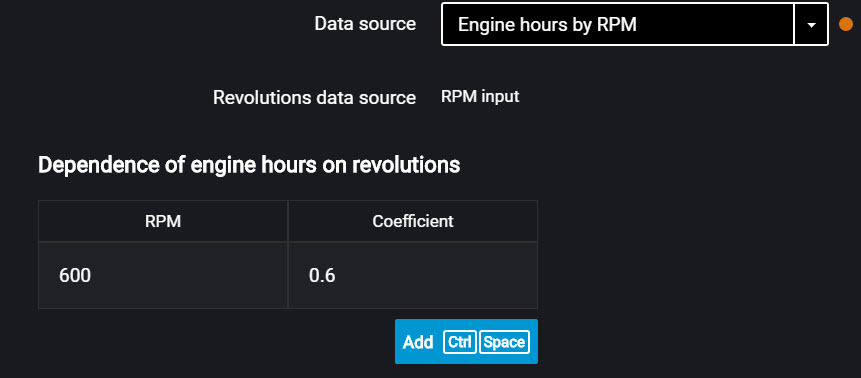
When selecting “Engine hours by RPM”, fill in the table of RPM recalculation to engine hours as follows:
In the field “Revolutions per minute” enter the value of RPM, in the field “Factor” enter the value of conversion factor to calculate the engine hours value.
The conversion coefficients are determined based on the operating conditions of the vehicle. Maximum number of rows – 5.
Engine hours are displayed on the LLD indicator as hour values with a fractional part (1.50 means 1 hour 30 minutes) in the format HH.XX in the range of up to 100 hours and HHH.X in the range of 100.0 to 999.9 engine hours. If the number of engine hours is more than 1000, the last three significant figures are displayed and one symbol after the decimal point.
Engine hours are fully recorded in the terminal and sent to the CS on a continuous accrual basis.
Tachograph
Connect the Continental tachograph to the OKO video terminal via RS-232 and RS-485 interfaces according to the diagram:
Power connections of the terminal and the tachograph must be made similarly: both after the vehicle ground disconnect switch.
When needed, it is recommended to use the RS-232 to RS-485 converter.
To read the DDD files from the Continental tachograph, in Omnicomm Configurator configure the RS-232 or RS-485 interface of the terminal.
CAN-LOG controllers
Omnicomm OKO video terminals support the connection of CAN-LOG controllers.
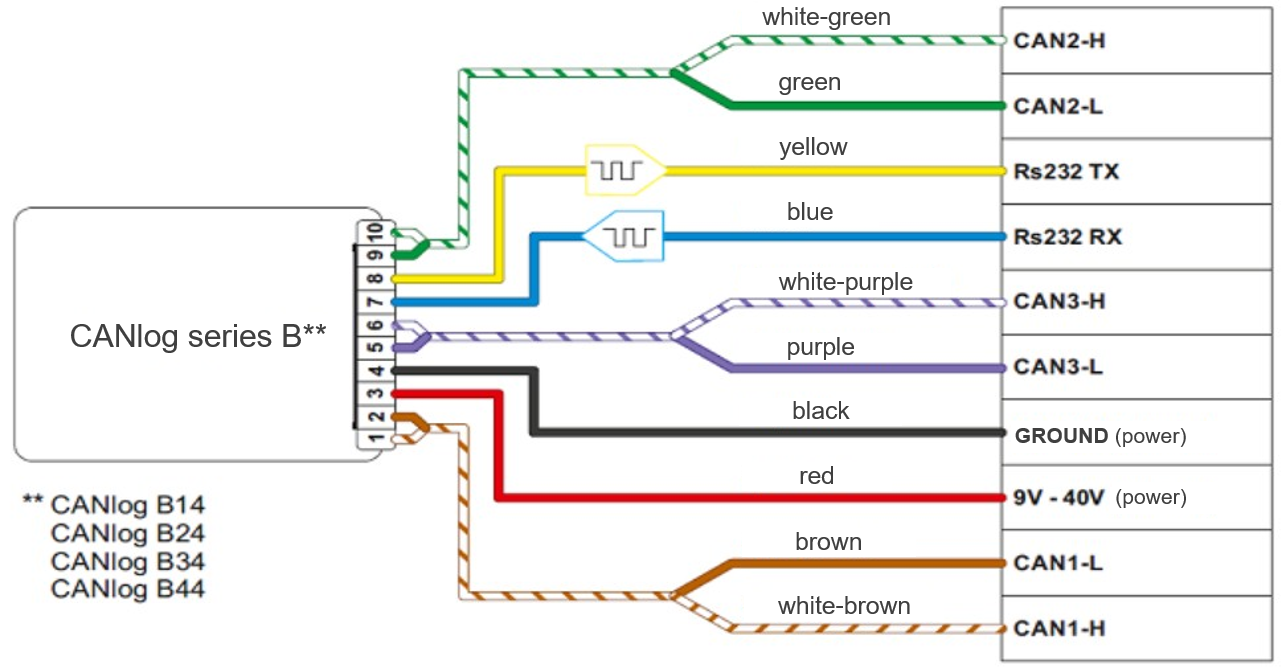
Connect the CAN-LOG, series B14, B24, B34, B44, to the vehicle's CAN bus, as shown in the diagram:
Follow the instructions provided by the CAN-LOG manufacturer during connection.
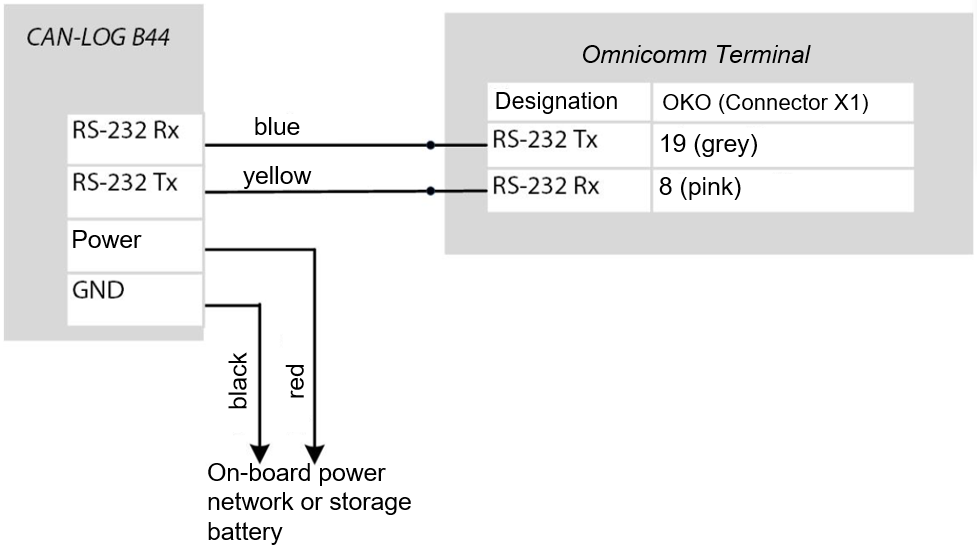
Connect the CAN-LOG to the terminal via the RS-232 interface as shown in the diagram:
In Omnicomm Configurator, in the “Settings”/“Inputs” window, in the “RS-485 and RS-232 Interface Configuration” section:
“RS-485” - select CAN log.
CAN-LOG parameters, displayed in Omnicomm Online and in Omnicomm Configurator
| SPN | Omnicomm Online | Configurator | CAN-LOG series B V4 | CAN-LOG series B V2 | CAN-LOG series P V1 |
|---|---|---|---|---|---|
| 70 | Park. brake status | Parking brake status | Yes | Yes | Yes |
| 91 | Acceler. pedal pos., % | Accelerometer pedal position (%) | Yes | Yes | Yes |
| 96 | Fuel level | Yes | Yes | Yes | |
| 110 | Eng. coolant temp., °C | Engine coolant temperature | Yes | Yes | Yes |
| 175 | Eng. oil temp.,°C | Engine oil temperature | Yes | ||
| 182 | Daily fuel cons., l | Daily fuel consumption | Yes | Yes | |
| 190 | Engine RPM, rpm | Engine RPM | Yes | Yes | Yes |
| 244 | Daily mileage, km | Daily mileage | Yes | Yes | |
| 245 | Odometer reading, km | Total mileage | Yes | Yes | Yes |
| 247 | Engine hour meter reading, hour:min | Total engine operation time | Yes | Yes | Yes |
| 250 | Fuel consumption meter reading, l | Overall fuel consumption | Yes | Yes | Yes |
| 527 | Cruise Control status | Cruise Control status | Yes | Yes | |
| 582 | Axle load, kg | Axle load | Yes | Yes | Yes |
| 597 | Serv. br. ped. status | Status of the service brake pedal | Yes | Yes | Yes |
| 598 | Clutch ped. status | Status of the clutch pedal | Yes | Yes | |
| 914 | Mileage before maintenance, km | Mileage before next maintenance | Yes | Yes | |
| 916 | Engine hours before maintenance, h | Time before next maintenance | Yes | Yes | |
| 1624 | Inst. speed, km/h | Instantaneous speed | Yes | Yes | Yes |
Custom Modbus
The Omnicomm OKO video terminals with the firmware version of FW310 or higher support the connection of an external device operating via the Modbus protocol
Only one device working via the Modbus protocol can be connected to the terminal.
Pre-check the settings of an external device: port, baud rate, and device IP-address.
Connect an external device via the RS-485 or RS-232 interface.
Connect an external device via the RS-485 interface according to the diagram:
Connect an external device via the RS-232 interface according to the diagram:
Follow the instructions provided by the external device manufacturer during connection.
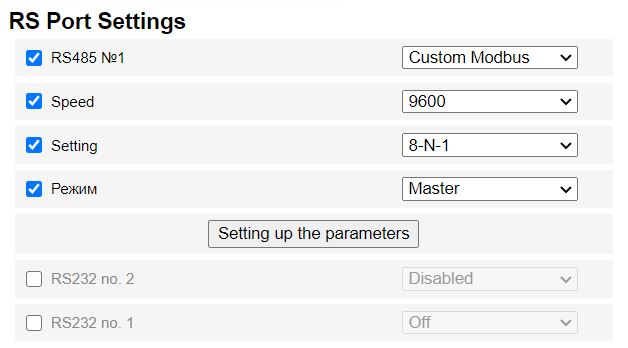
In the Omnicomm Configurator program in the “Settings” / “Inputs” window or in the remote configuration server in the “RS-485 and RS-232 interfaces configuration” section:
“Custom Modbus” – is used to connect equipment which operates with Modbus protocol standard (except for Light, Smart).
When selecting “Custom Modbus”:
“Port baud rate” – specify the Modbus port baud rate operation Possible options: 9600, 19200, 38400, 57600, 115200.
“Port settings” – select the port settings. Possible options: 8-N-1, 8-N-2, 8-Е-1, 8-Е-2, 8-О-1, 8-О-2.
In the remote configuration server, select the terminal operation mode and add parameters if necessary:
“Master” – terminal sends requests for the access to the registers from the external devices via Modbus protocol
“Listener” – terminal listens and receives the required data during the exchange via Modbus protocol
In the Omnicomm Configurator, the terminal operation mode is configured and the parameters are added in the “Settings” / “Modbus” (see Modbus).
Universal Inputs
Universal inputs are intended for connecting the auxiliary equipment with pulse, potential, analog or frequency output and its operation monitoring.
In the “Settings” tab select the “Inputs” section from the list.
In the “Universal Inputs” section:
Sensors with pulse output
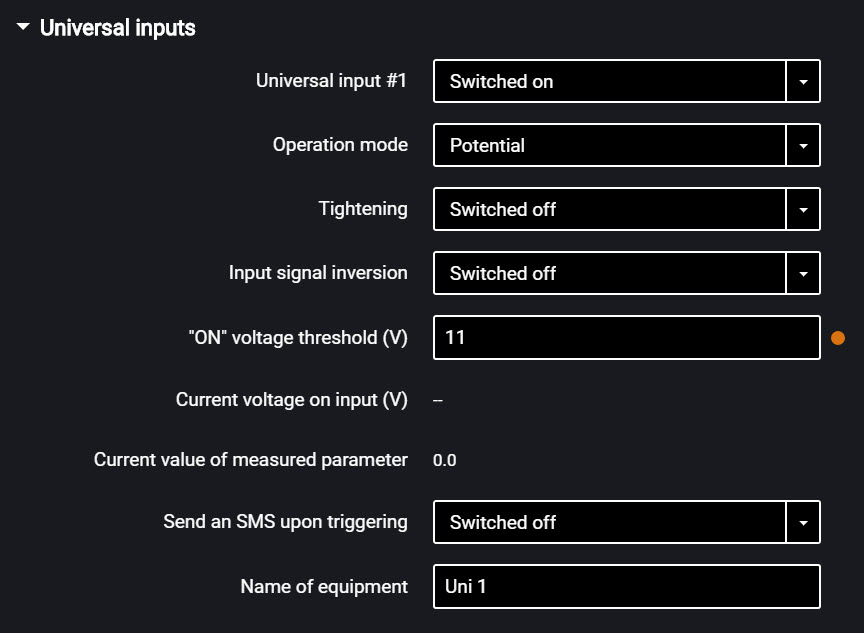
“Universal input” – select “Enabled”.
“Operating mode” – select “Pulse”.
“Equipment name” – enter the monitored parameter name.
“Pull-up resistor” – select “Enabled” when working with “open collector”-type sensors or contact sensors.
“Coefficient of impulse” – enter the calibration factor converting the number of pulses to the determined physical quantity.
“Number of pulses from the input” (in Omnicomm Configurator) – number of pulses coming at the universal input.
“Current value of measured parameter” – displays the value at the input with account for the calibration factor.
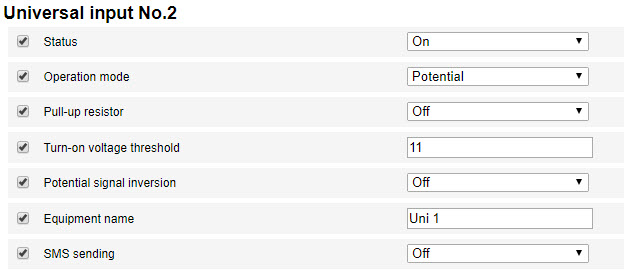
“Universal input” – select “Enabled”.
“Operating mode” – select “Potential”.
“Potential input activation voltage threshold” – set the value of voltage threshold, after which the terminal will record activation of the sensor. Default value – 9 V.
“Pull-up resistor” – select “Enabled” when working with “open collector”-type sensors or contact sensors.
“Input signal inversion” – set “Enabled” for the sensor with open contacts or contacts closing on commission of any action.
“Current voltage” – value of the voltage at the universal input of the terminal.
“Current value of measured parameter” – auxiliary equipment switched on or off.
“SMS sending upon triggering” – select “Enabled” to send SMS when the potential universal input is triggered.
“Equipment name” – enter the monitored parameter name. Possible sensor types: contact or contactless digital sensors.
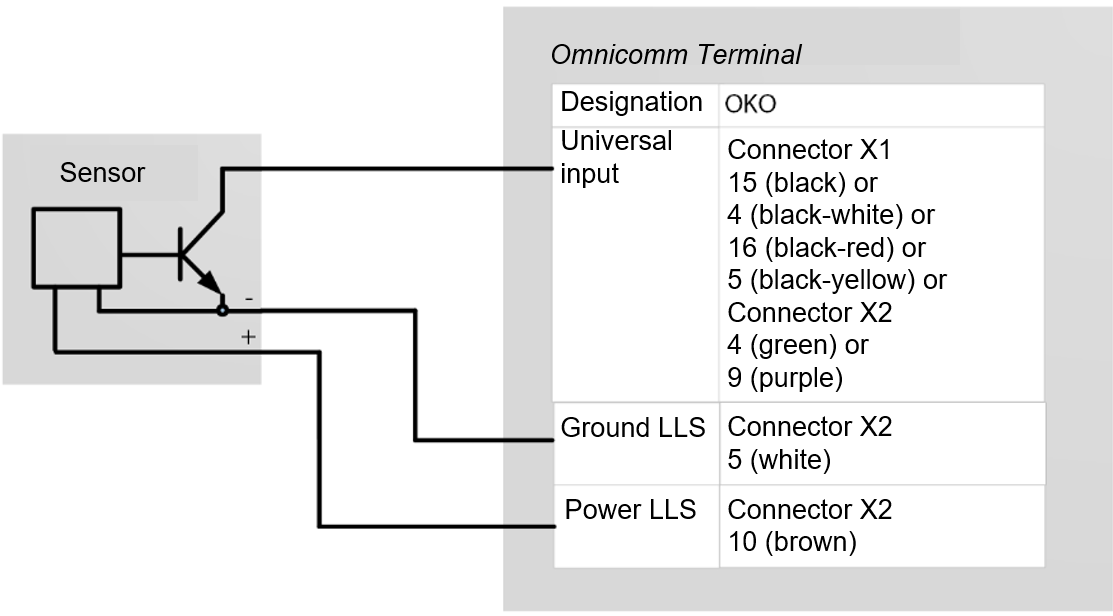
Connect contactless sensors (capacitance, inductance, optical or magnetic) and N-P-N sensors with “open collector”-type input according to the diagram:
 Connect contact sensor according to the diagram:
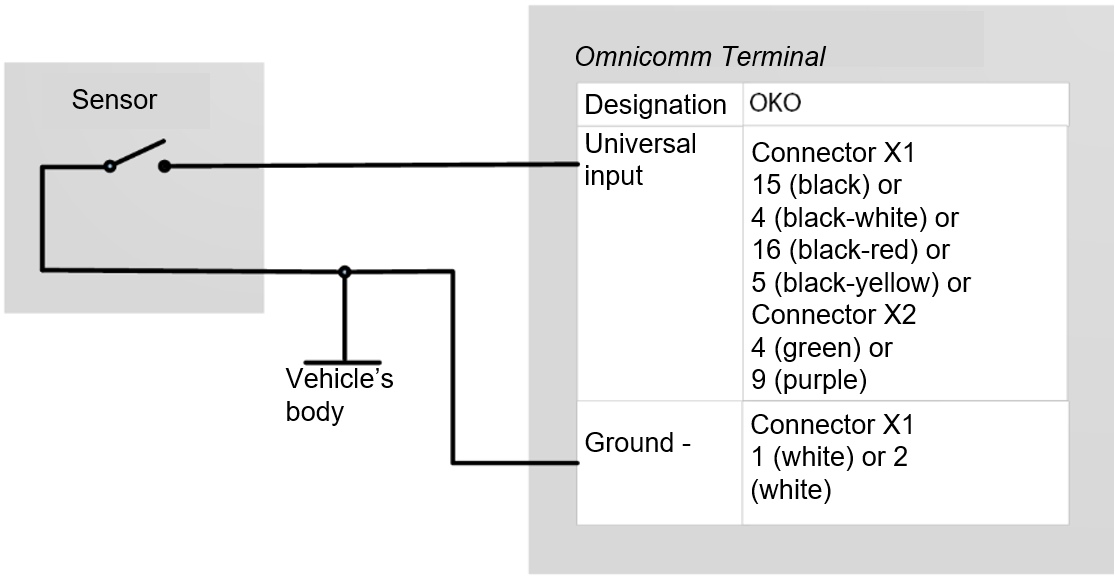
You can use standard equipment control elements (activation buttons / limit switches / sensors triggered by excess pressure or temperature, etc.) or an additionally mounted sensor as the contact sensor. We recommend that you first check the possibility of connection to a standard device and install an additional sensor only if there is none.
Sensors with analog output
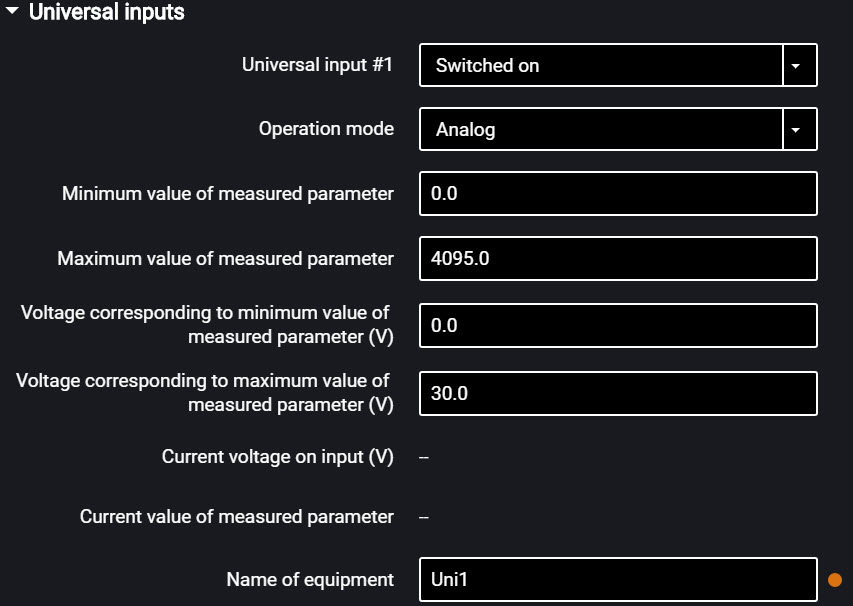
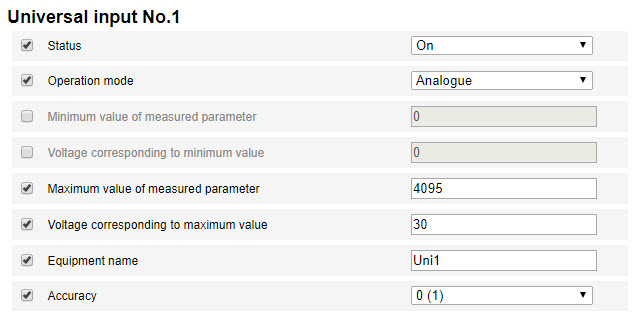
“Minimum measured value” – set the minimum value to be measured by the sensor (in the units of measurement of this value).
“Voltage corresponding to the minimum value” – set the value of voltage corresponding to the minimum measured value.
“Maximum measured value” – set the maximum value to be measured by the sensor (in the units of measurement of this value).
“Voltage corresponding to the maximum value” – set the value of voltage corresponding to the maximum measured value.
“Current voltage at universal input” – value of the voltage at the universal input of the Terminal.
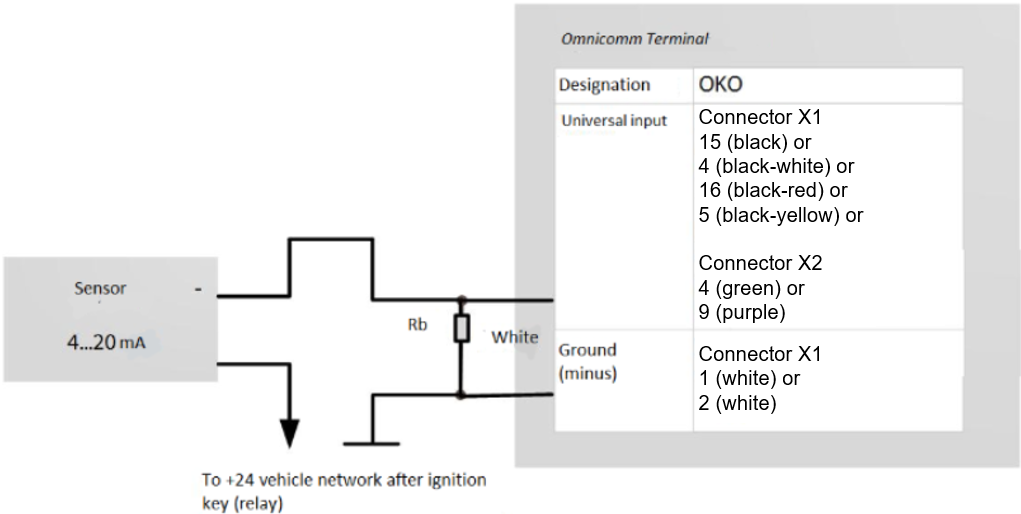
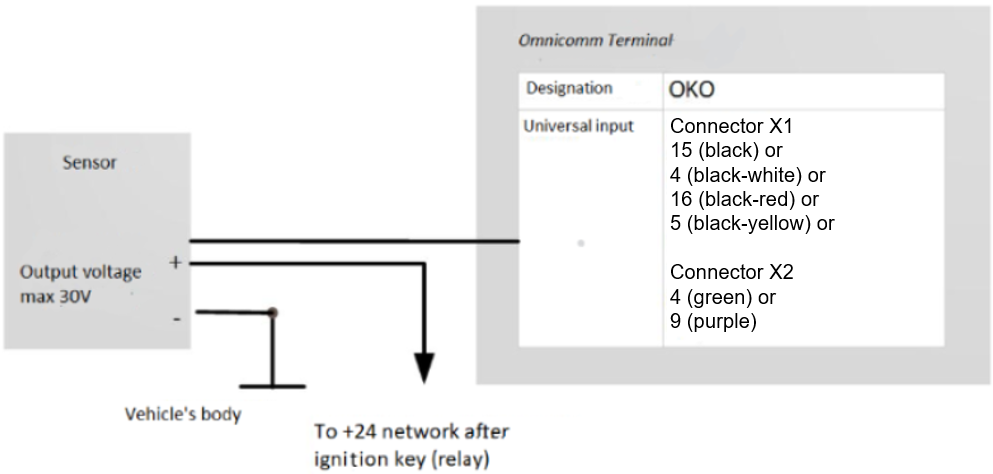
“Current value of measured parameter” – current measured value. “Equipment name” – enter the monitored parameter name. Analog sensor types:
- with uniform current output:
- with uniform voltage output:
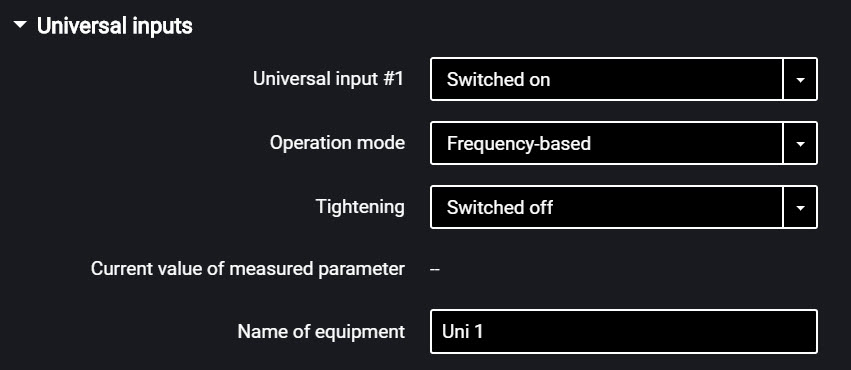
“Universal input” – select “Enabled”.
“Operating mode” – select “Frequency”.
“Pull-up resistor” – select “Enabled” when working with “open collector”-type sensors or contact sensors.
“Current value of measured parameter” – current measured value.
“Equipment name” – enter the monitored parameter name.
Driver Identification
In the “Settings” tab select the “Identification” section from the list.
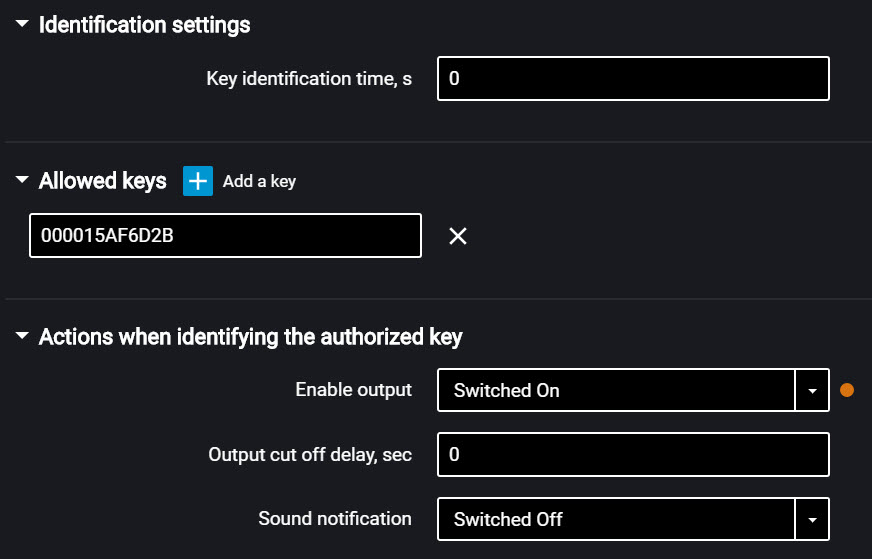
In the “Identification settings” section:
“Key/card identification duration” – specify the time value when iButton is applied, after which will be enabled the second digital output of the terminal. Possible values: from 0 to 60 seconds.In the “Authorized keys” section check the box and enter the iButton key numbers, which application will enable the second digital output. The key number is indicated in 6-byte format.
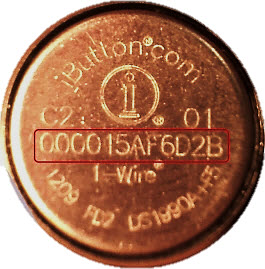
For example, for a key you must enter: 000015AF6D2B
If no key is indicated in this section, the events will be recorded for all applied keys.
“Output activation” – select “enabled” if you want to activate the second discrete output when the iButton / card authorized key is applied.
“Output cut off delay” – specify the time after disconnecting the iButton / card key from the readout device, after which the second digital output will be disabled. Possible values: from 0 to 3600 seconds.
If necessary, enable/disable the sound reminder of the driver’s authorization in the field “Enable sound reminder” – “Yes”/”No”, respectively.
iButton readout device connection and installation
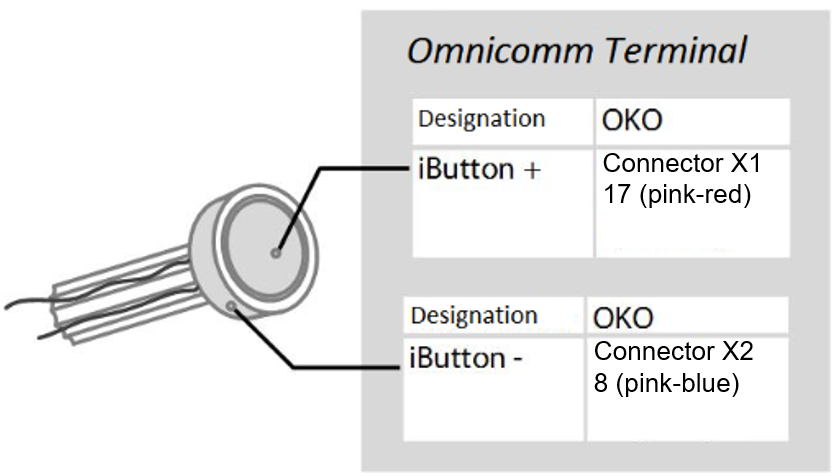
Determine the correspondence of the wire colours to the reader contacts, ringing out the wires and reader body contacts with each other using multimeter. Connect the iButton reader according to the diagram:
iButton reader must be installed on the vehicle front panel or in the service cover on the vehicle front panel.
At the installation site, drill a hole of Ø9 mm, install the iButton reader device, put on the sealing ring and lock washer.
Connect the sound emitter:
1. Connect the yellow-red wire of the sound emitter to the controlled output of the terminal, connect the brown wire to +12 V /(+24 V) vehicle network
2. Perform installation on/under an inclined or horizontal surface of the vehicle cabin front panel, fixing it with screws (self-tapping screws) or glue
3. At the installation site, when using screws, drill holes as shown in figure:
4. Mount the sound emitter on the prepared surface and fix.
Temperature Sensors
The Omnicomm OKO terminals support the connection of up to 8 temperature sensors.
On the “Settings” tab select section “Auxiliary equipment” from the list.
The “Temperature sensors” displays the temperature readings from the sensors, connected via 1-Wire interface.
Set up the temperature sensors. Choose the set up option:
- set up of the 1-Wire interface. Press the “Set up the temperature sensors” button
- set up via the universal input. Press the “Set up the temperature sensors (UI)” button
Set up of the 1-wire interface:
“Name” – input the name of the temperature sensor.
“Value” – displays the readings from the sensor.
“ID” – select the ID number of the temperature sensor.
Set up via the universal input:
“Transmit the readings of the 1-Wire sensor instead of UI” – select the number of the universal input for displaying the temperature readings in Omnicomm Online.
Connect the temperature sensors to Omnicomm terminals according to the diagram:
1-Wire sensor connection diagram with an extended range of external power supply:
Make sure that the onboard voltage does not exceed the max power supply voltage of the temperature sensor specified in the sensor passport.
1-Wire DS18B20 sensors connection diagram on a double-wire circuit with additional power supply from the terminal for operation in an extended range below -20 C and above +60 C:
In case of configuring the terminal in Omnicomm Configurator it is necessary to disable the possibility to use GSM call button (in the “GSM and SMS connection parameters” / “Headset” section – off, see Data Transmission to a Communication Server).
RFID Reader Devices Connection
Terminal supports connection of swipe card reader devices via 1-Wire physical interface.
The connected reader device must fully simulate the exchange protocol of DS1990A product.
Timing diagrams must be executed for all officially declared specifications.
Voice communication
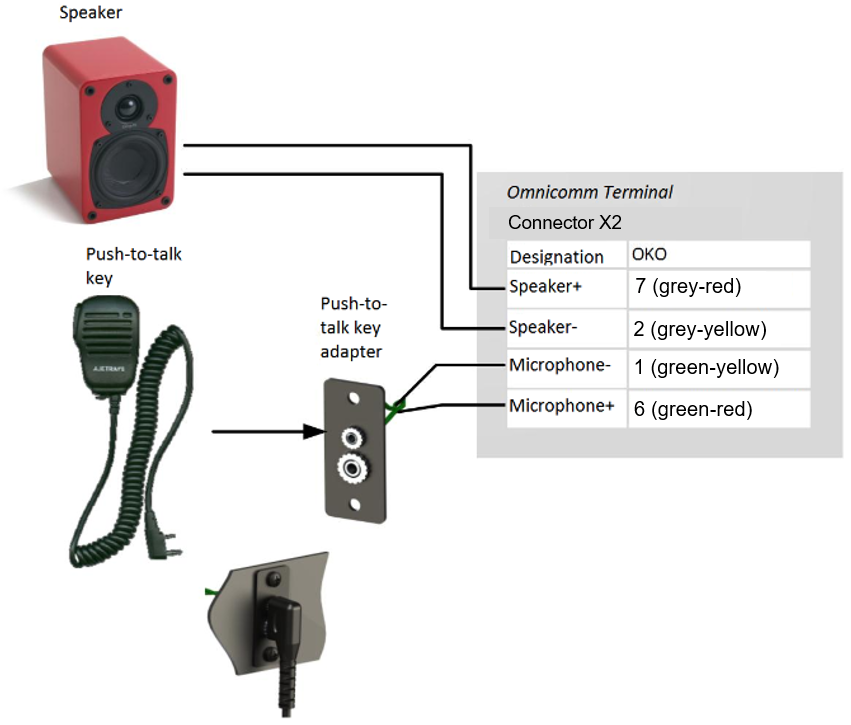
Determine the correspondence of the wire colours to the push-to-talk key adapter contacts, ringing out the wires and adapter contacts with each other using multimeter. Connect the Omnicomm OKO terminal voice communication set according to the diagram:
1. At the installation site, drill two holes Ø2.5 mm:
2. Drill a rectangular hole 30×12 using a milling cutter or a drilling bit and install a push-to-talk key adapter
3. Fix the push-to-talk key adapter on the surface with self-tapping screws
4. Connect the push-to-talk key connector with the adapter connector:
Controlled Equipment
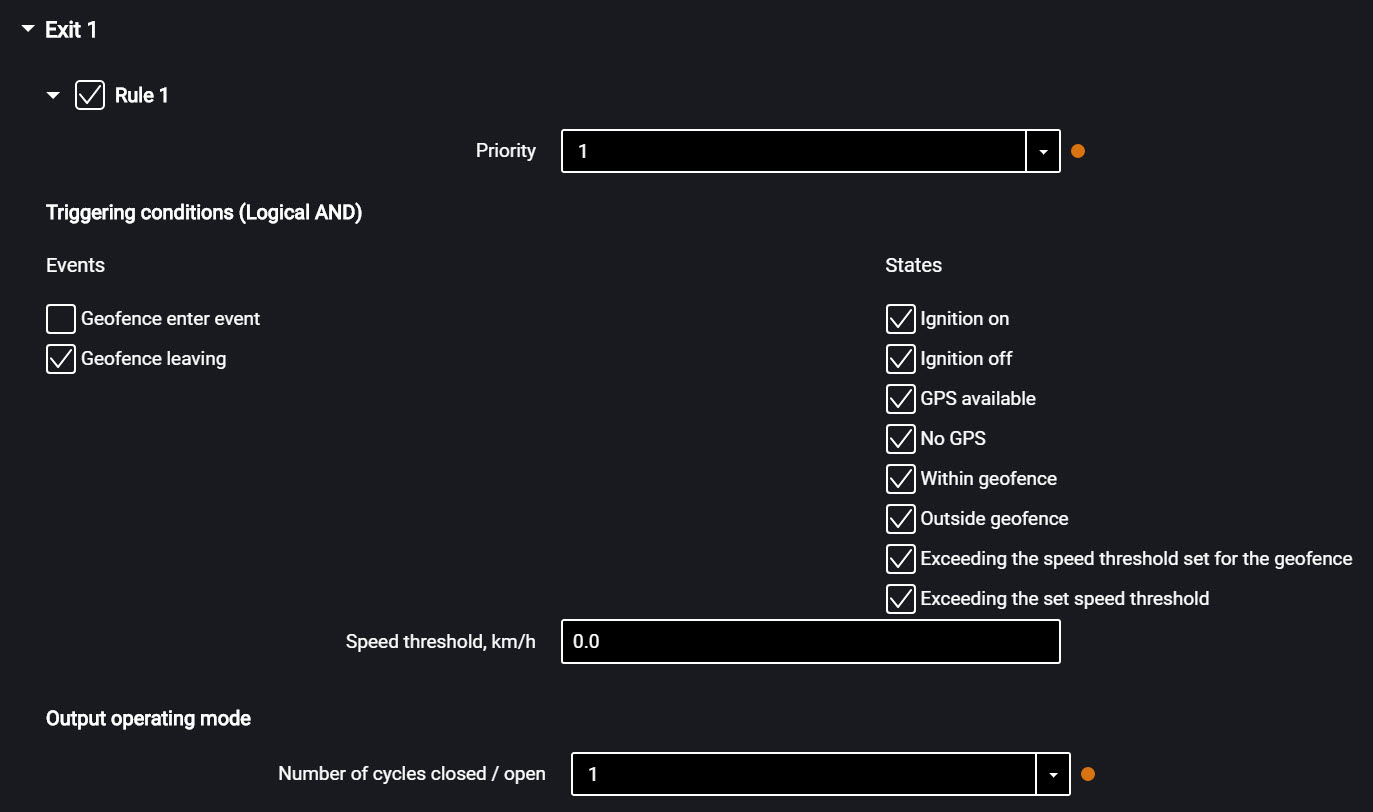
In the video terminals, for each controlled output, up to three operation rules are provided.
The rules are set by event or by a combination of events and states.
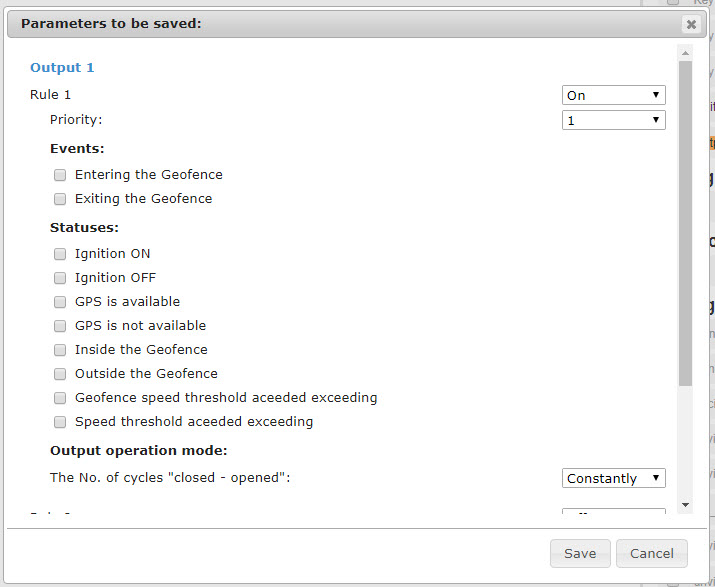
In the “Settings” tab select the “Outputs” section from the list:
“Rule priority” – set the priority of the rule. When at the same time several rules apply, a rule with the highest priority is used.
Possible options: 1 (highest), 2, 3 (lowest).
Select “Events”:
- Entering the geofence
- Leaving the geofence
Select “States”:
- Ignition on
- Ignition off
- GPS available
- No GPS
- Being in geofence
- Being outside geofences
- Exceeding speed threshold set for geofence
- Exceeding the set speed threshold
In the “Output operation mode” section:
Number of “closed-open” cycles – specify the number of output enabling/disabling. Possible options:
- continuous – the output is always enabled (only available for states)
- from 1 to 9 – (only relevant for events, because for states fulfillment of this condition would lead to indefinite cycle repeating)
When selecting the number of cycles, specify:
“Delay before closing” – specify the time until the output activation. Possible values: from 0.1 to 9.9 s.
“Duration of closing” – specify the time, during which the output must be activated. Possible values: from 0.1 to 9.9 s.
“Duration of opening” – specify the time until the next output activation. Possible values: from 0.0 to 29.9 s.
Example 1. The following values are set:
- State – “Being in geofence”
- Number of “closed-open” cycles – 5
If the vehicle is inside the geofence, the output will be enabled and disabled 5 times. Output enabling/disabling (5 times each) will be repeated until the vehicle exits the geofence.
Example 2. The following values are set:
- State – “Being outside geofence”, “GPS available”
- Number of “closed-open” cycles – “Continuous”
If the vehicle is outside the geofence and the GPS module data are valid, the output will be enabled, until the moment of entering the geofence or GPS data absence.
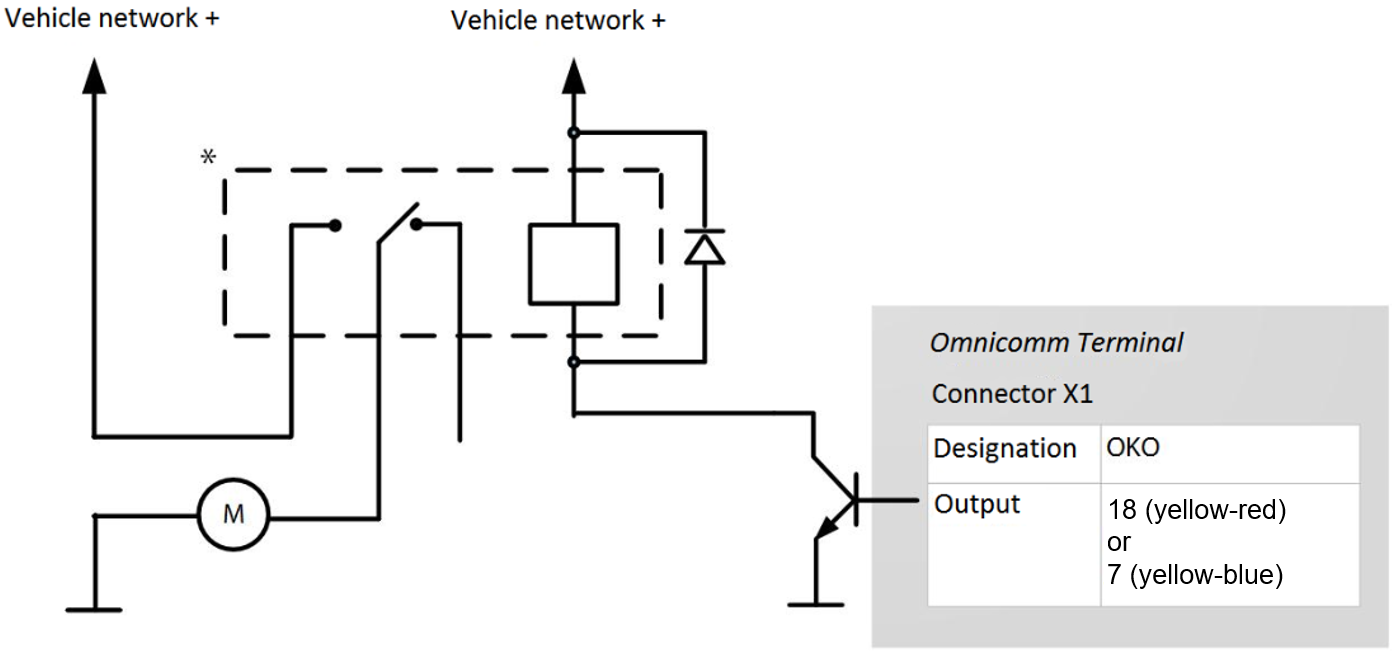
Connect auxiliary equipment to controlled outputs of the video terminals according to the diagram:
* Relay with operation voltage suitable for the voltage of this vehicle network (12 or 24 VDC)
You can also control digital output by SMS commands: *SETDOUT param#, *GETDOUT#, *CLRDOUT param#
Voice Communication Kit
The voice communication kit is installed in the vehicle's cabin.
To mount the microphone holder, remove the protective film from the double-sided tape and press it against the prepared surface.
To mount the speaker, use the bracket and self-tapping screws.
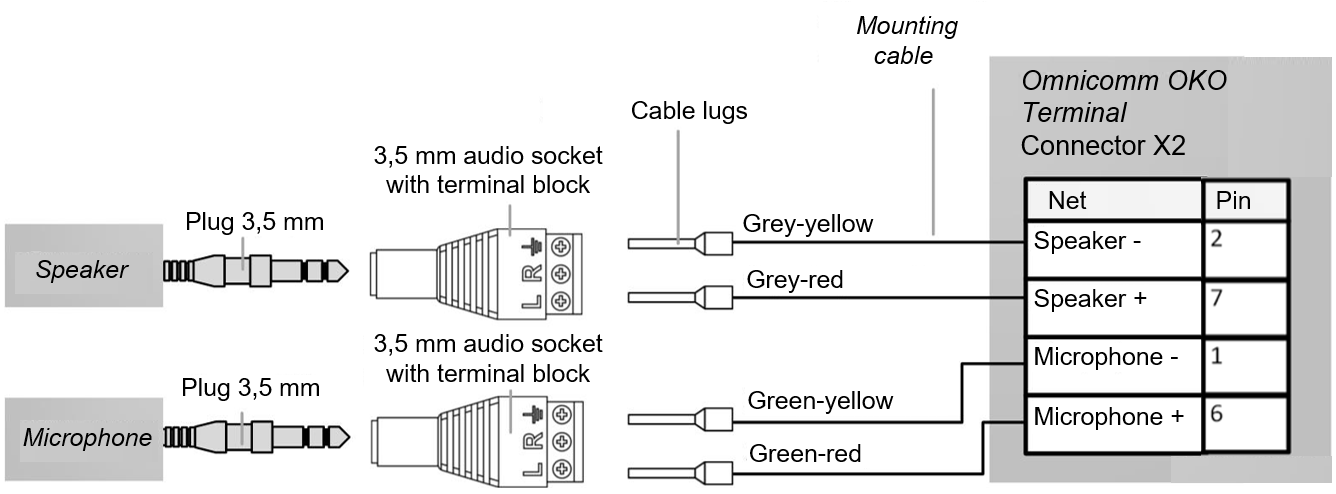
To connect the voice communication kit to the Omnicomm video terminal crimp the wires of the Omnicomm Profi terminal with cable lugs using a crimping tool (e.g. HT-864; HT-866; PKVK-10) or pliers and connect as shown in the diagram
Geofence Setting
In the terminals, geofence setting is provided to enable the controlled outputs.
In the “Settings” tab select the “Geofences” section from the list.
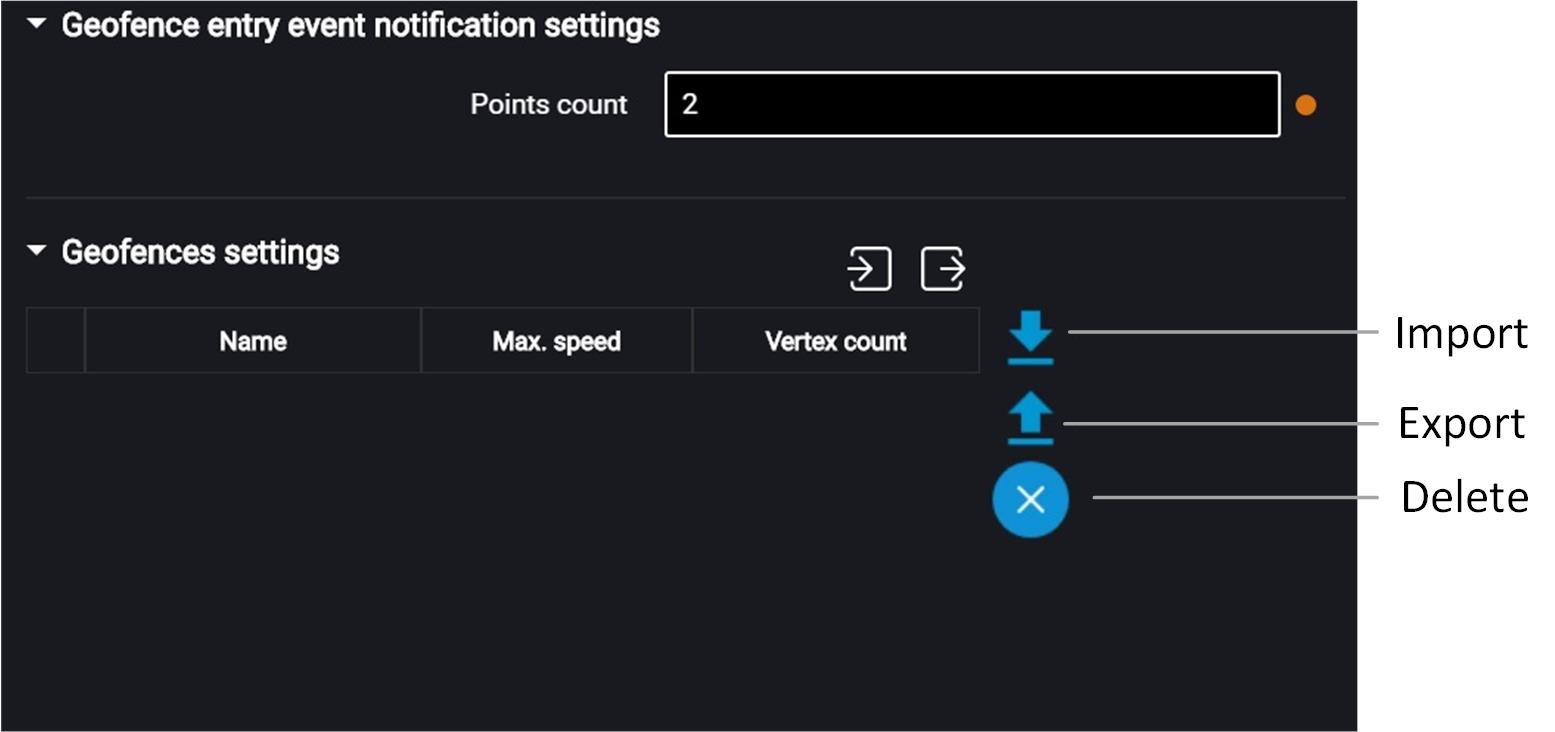
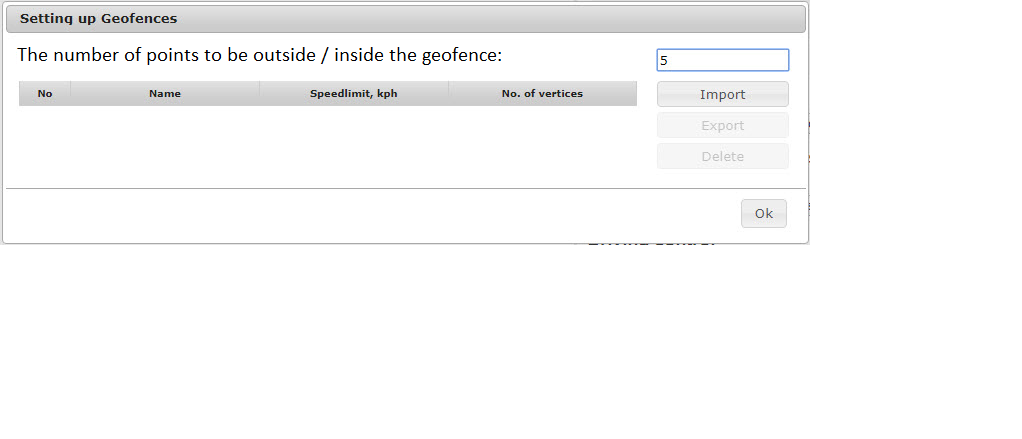
“Number of points to confirm being inside/outside the geofence” – specify the number of successively defined vehicle coordinates required to register the vehicle being inside or outside the geofence. Coordinates determination time – 1 sec. Possible values: from 1 to 10.
To add a geofence, press the “Import” button and select the .xml file with geofence settings.
The geofence name must be not more than 8-character long and consist of symbols, digits and Latin letters.
Geofence should not contain consecutive points with the same coordinates.Maximum number of geofences – 6.
Maximum number of peaks – 24.
Panic Button and GSM Call Button
In the “Settings” tab select the “Auxiliary equipment” section from the list.
In the “Panic button parameters” section:
“Data source” – enable/disable condition control of the panic button.
“SMS sending upon triggering” – enable/disable SMS sending upon the panic button pressing.
Connect the panic button according to the diagram:
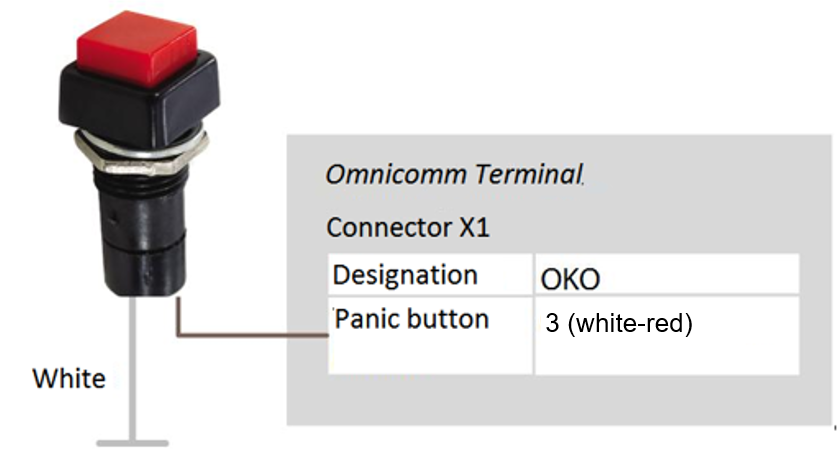
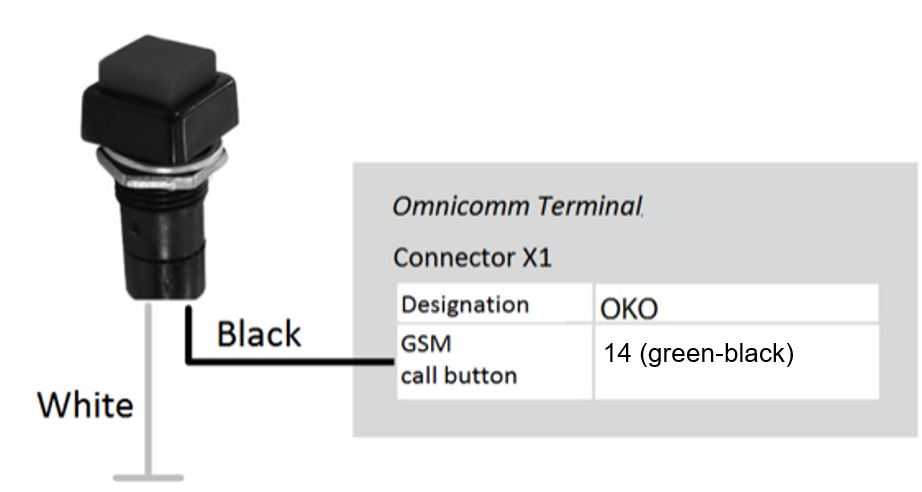
Connect the GSM response button to video terminals according to the diagram:
Modbus
On the “Settings” tab select the “Modbus” section from the list:
Select the operation mode:
“Master” – terminal sends requests for the access to the registers from the external devices via Modbus protocol
“Listener” – terminal listens and receives the required data during the exchange via Modbus protocol
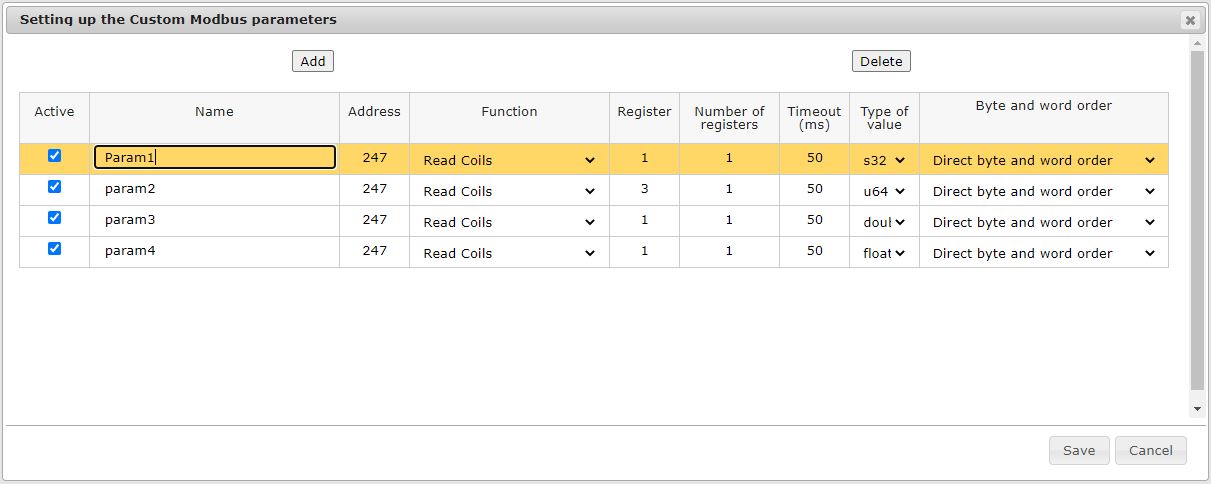
When is necessary to add parameters press the “Add” button. A window will open:
“Name of parameter” – enter the name of the parameter. Maximum length: 16 symbols.
“Address” – address of the tracked device. Possible values: 1 to 247.
“Function” – – enter the function number Possible values: 01 – Read coils, 02 – Read discrete inputs, 03 – Read holding registers, 04 – Read input registers.
“Register” – enter the register value. Possible values: 0 to 65535.
“Number of registers”. Possible values: for functions 1, 2 – from 1 to 64; for functions 3, 4 – from 1 to 4. Default value – 1.
“Time out” – enter the waiting time for the response of the device. Default value – 50 ms. Possible values: from 50…12500 ms.
“Value type” – select the data type. Possible values: S16, U16, S32, U32, U64, float, double, bin.
“Byte order” – select the order of words and bytes. Possible values: direct order of words and bytes, reverse order of words and bytes, reverse order of bytes, reverse order of words. Default value - direct order of words and bytes.
Maximum parameter number – 36.
CAN Bus
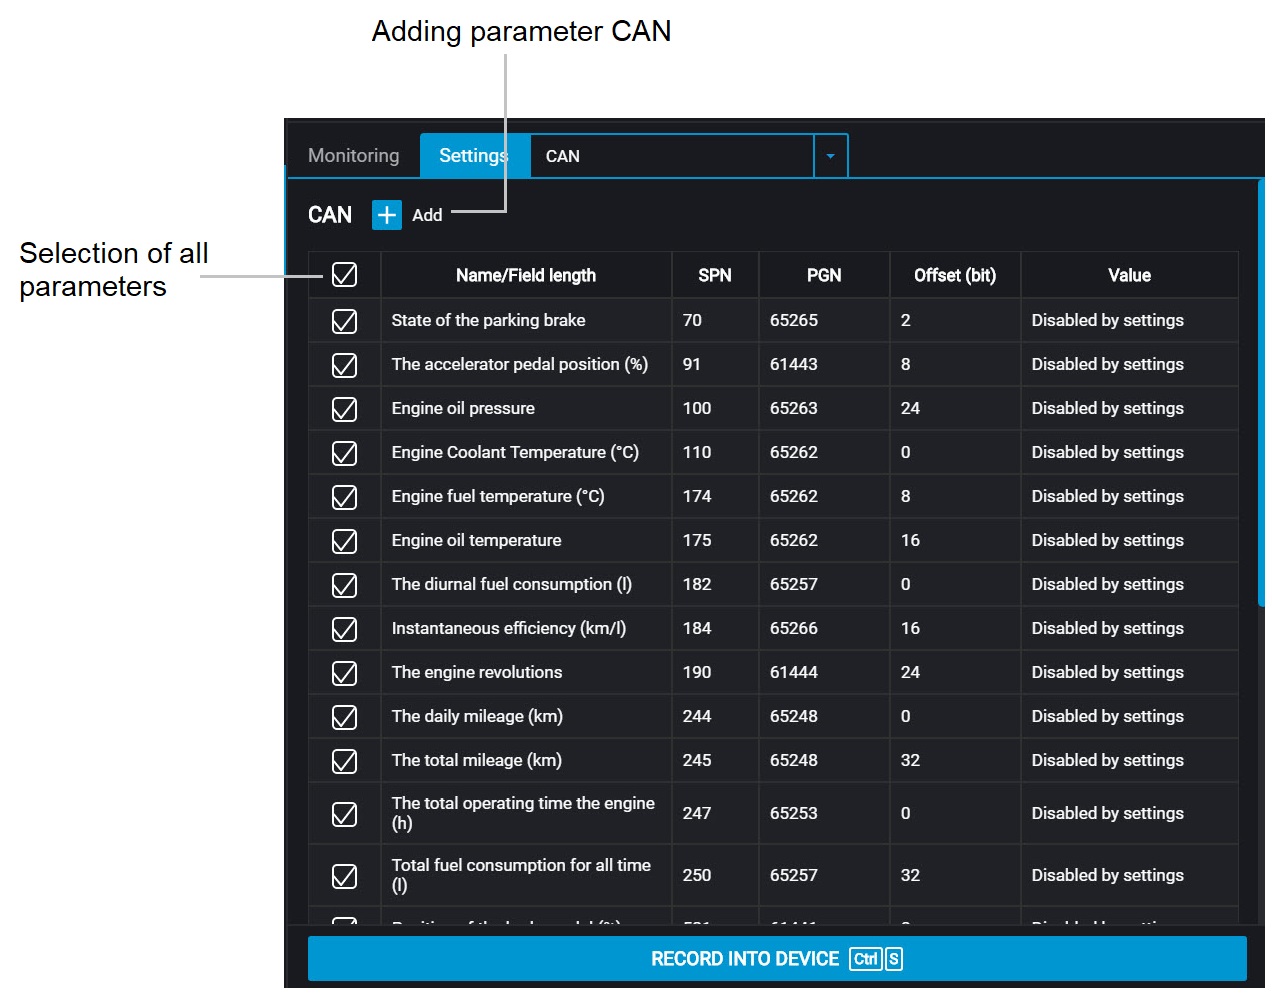
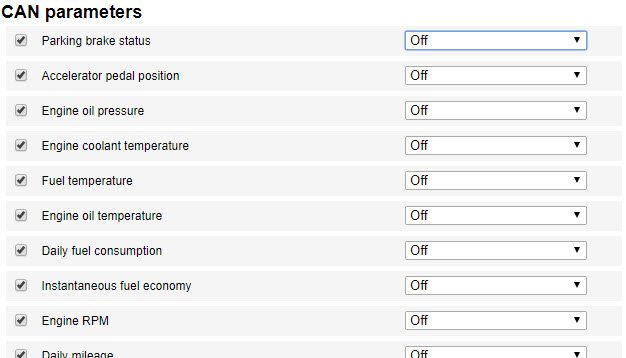
In the “Settings” tab select the “CAN” section from the list.
From the list, select the parameters, which value shall be displayed in Omnicomm Online, and check the corresponding boxes in the “Use” column.
“Use ContiPressureCheck” – check the box for processing of data received from the ContiPressureCheck tire pressure monitoring system. When the ContiPressureCheck system is used, you must configure the tire pressure monitoring in Omnicomm Online (see Omnicomm Online. Administration Guide).
If you need to add parameters for reading from the CAN bus, which are not on the list, press the “Add” button in Omnicomm Configurator. A window will open:
“Length” – select the length of the data packet. Possible values: 1, 2, 3, 4 (bit), 1, 2, 4 (bytes).
“PGN” – enter the parameter group number that defines the contents of the corresponding message according to SAE J1939. Possible values: from 1 to 262143.
“Offset” – enter the offset value relative to the base address of the bit storing area. Possible values: from 0 to 63.
“SPN” – enter the parameter code according to SAE J1939. Possible values: from 0 to 4294967295.
“Use” – check the box if you want to read this parameter from the CAN bus. Press the “Save” button.
The connection to the vehicle CAN-bus should be performed via the concatless CAN reader (CAN-crocodile).
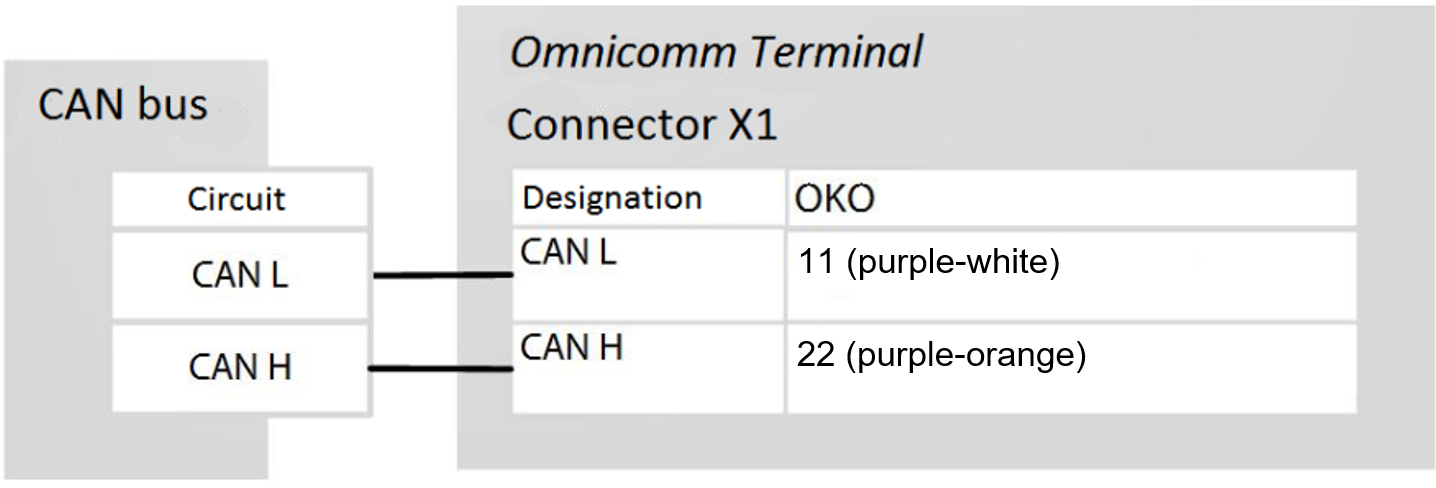
When using contactless CAN readers, the connection of the CAN readers to the terminals should be performed according to the scheme:
Configuring the reception of data on the fuel volume in the tank from the vehicle CAN bus Connect and configure reception of the vehicle equipment operation parameters from CAN J1939 data bus and set the setting of fuel sensor – “CAN Sensor”.
Check indication of the fuel sensor values in the “Monitoring” tab, the value must be from 0 to 4095.
When reading the fuel level in the tank from the CAN bus, set the operating mode of the terminal while ignition off to “Collect data during pounding” mode. Otherwise, the fuel level graphic will not be displayed correctly.


