Login
You are currently not logged in! Enter your authentication credentials below to log in. You need to have cookies enabled to log in.
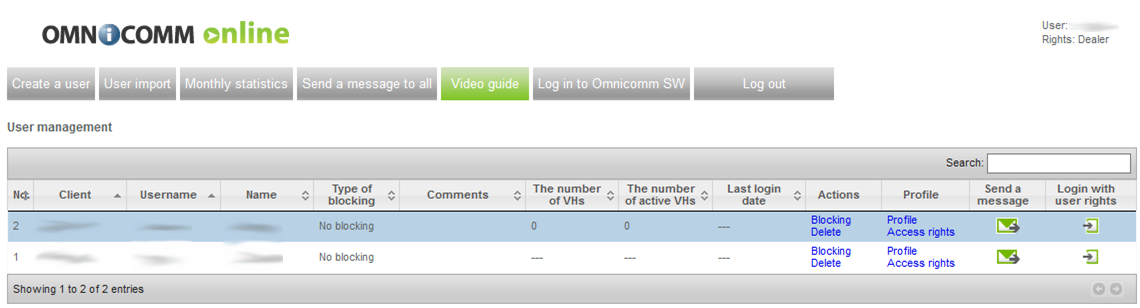
Addition
To add a user in the dealer's profile press button “Create a user”:
Window will open:

“Login” enter login of a user account which will be used for authorization on Omnicomm Online. The login shall contain up to 20 characters and be unique.
“Password” enter a password to a user account. The password shall be following:
- the password and login shall not be the same;
- the password shall not contain more than two identical characters one after another;
- the password shall not contain more than 3 identical successive characters constituting a regular sequence on a keyboard;
- the password shall contain from 3 to 20 characters.
“Email” is an Omnicomm Online user email address.
“Full name” is a Full name of Omnicomm Online user.
“Job title” is a job title of user in the company.
“Telephone number” is a telephone number in free format.
“Company” is a name of the company, whose part the user is. If the field “Company” is filled in the monthly report, the dealers VH will be grouped by a company-owner. It is recommended to leave the field empty, if a user is not a part of an end client, e.g. the dealer's employees logins.
“Display in interface” select in a drop-down menu information to be displayed as a user account. Allowed options: “Full name”, “Login”, “Company name”.
“Language of notifications and reports” select language of notifications and reports. Allowed options: Russian, English, Portuguese, Spanish, Thai.
Edit access rights to objects and user reports selecting “Assign access rights” (see Access rights setup).
If you don't assign access rights to objects, a user won't be able to access any report.
Import
Users import allows to transfer user profiles (login, password, full name and comments) between Omnicomm Online dealers.
When importing user profiles objects structure and access rights to objects do not transfer.
In the dealer profile press button “Users import”.
The window will open, in this window press link Select user profiles files.

The window will open, select user profiles in it, which need to be loaded to Omnicomm Online.
Press button “Open”.
Press link “Import”. Users import process will display.
Setup access rights to imported users.
Blocking and unblocking
There are two options of user blocking in Omnicomm Online:
- Complete blocking. Complete blocking prohibits access to Omnicomm Online under account of the blocked user. The users with a complete blocking installed are highlighted in pink.
- Blocking of report generation period Blocking of report generation period prohibits generation of a report for a period of time set during blocking. The list contains users with set blocking of the report generation period are highlighted in beige.
In the dealer's profile select a user from the list to whom you would like to prohibit access to Omnicomm Online and press link “Blocking”. The window will open, select a type of blocking to be setup for a user.
To setup complete blocking of a user mark “Complete blocking”. When it is required enter a comment. Press button “Save”.

To block report generation period mark “Block report generation period” and press button “Add”. Select a start and end date of blocking period pressing icon Calendar . Press button “Save”.
To unblock report generation period select a blocking period from the list, which shall be removed and press button “Remove”. Press button “Save”.
To remove complete blocking of a user untick “Complete blocking”. Press button “Save”. After unblocking a user will be able to access all data including data belonging to a user blocking period.
Access rights setup
In the dealer's profile select a user from the list, whose access rights need to be set up and press link Access rights. Window will open:

In section “Rights to reports”:
“Addition, change and removal of user reports” tick to provide a user access to management of user reports.
“Allow a user to manage reports visibility” tick to provide a user an access to settings of reports display.
“Validation of report events” tick to allow a user to exclude from report “List of refuelling and draining” refuelling and draining events.
Select reports which will be available to a user and tick. Allowed reports:
- the list of refuelling and draining;
- statistics;
- violations;
- events;
- group operation;
- summary report;
- report by shifts;
- event log;
- fuel dispensing;
- fuel dispensing, refuelling and draining;
- geofences attending;
- drivers assignment;
- movement between parkings;
- routes fulfilment;
- current routes;
- photos;
- track;
- location;
- fuel volume;
- fuel volume (engine hours);
- motor revolutions;
- speed;
- on-board system voltage;
- operation of additional equipment;
- movement for period;
- work for period;
- load for period;
- distribution of movement by time;
- distribution of work by time;
- distribution of load by time;
- group rating.
If an access to a main report is prohibited to a user, all user reports generated based on this report will be deleted.
In section “Rights to objects”:

“Administration of fuel cards” tick to provide a user an access to fuel cards administration.
Group creation is creation of a new group of objects to which a user will have an access. The name of the group will be generated automatically and correspond to the user's family name.
Group selection is selection of a group objects which will be available to a user or a group import.
If “Import” is selected, automatic readdressing to “Export/Import” section will be performed (see Objects, users and notifications settings export and import).
Select “Type of access” to a group of objects:
- “View” — a user can access all options (view reports) to work with objects in group except managing the object itself (editing/deleting).
- “Complete access” — a user can access all options to work and manage group objects rights to which are assigned to him/her.
- “Adjustable” a user can access only the options selected during setup.
Adjustable rights of access allow a user to perform the following actions depending on an object type:
Vehicles
- Import — VH import from a file to Omnicomm;
- Removal — removal of a VH from Omnicomm;
- Export — export VH profile to file;
- Editing tree — editing tree of VH in “Transport” section;
- View profile — view VH profile;
- Editing profile information parameters — is editing sections “Terminal” and “Vehicle” in the VH profile;
- Full profile editing is editing of all sections and parameters in the VH profile;
- Managing the VH is creation, removal and editing of tasks for maintenance.
Driver
- View profile is a view a driver profile;
- Creation/Editing/Import is creation, editing or import of driver profile from file to Omnicomm;
- Removal is removal of a VH from Omnicomm;
- Export is export driver profile to file;
- Editing tree is editing drivers tree in “Drivers” section;
- Driver assignment to VH is assignment and deassignment of drivers from VH.
Geofence
- Creation/Editing/Import is creation, editing or import of a geofence from file to Omnicomm;
- Removal is removal of a geofence from Omnicomm;
- Export is export of geofence profile to file;
- Editing tree is editing geofences tree in “Geofences” section;
Route
- Creation/Editing/Import is creation, editing or import of a route from file to Omnicomm;
- Removal is removal of a route from Omnicomm;
- Export is export of a route to file;
- Editing tree is editing route tree in “Routes” section;
- Managing schedule and trips
User
- View profile is a view a user profile;
- Creation/import is creation or import of a user from file to Omnicomm;
- Removal is removal of users from Omnicomm;
- Export is export VH profile to file;
- Editing profile is editing a user profile;
Profile change
When changing profile it is allowed to change a password and add a note to a use account.
In the dealer's profile select a user from the list, whose profile needs to be changed and press link Profile.

The window will open, make required changes in it and press button “Save”.
Removal
In case a user is removed, objects groups of a removed user are stored on Omnicomm Online.
In the dealer's profile select a user from the list, whose profile shall be removed and press link Remove.
A window of removal confirmation will open, press “Yes” in it.